Blush for Round Faces: Lift Without Contour
Learn how to apply blush for round faces to create lift without contour. Explore placement tips, gradient techniques, and before-after visuals for a sculpted glow.
17 Jun'25
By Niharika Paswan

Blush for Round Faces: Lift Without Contour
A round face has a charm of its own, such as soft, symmetrical, youthful. But sometimes, you just want a little sculpt. A touch of lift. The illusion of more structure, without diving into a full contour routine. That’s where blush becomes the hero.
Blush isn't just about adding color. When used right, it's one of the most effective ways to visually reshape and elevate a face. And for round faces, it can subtly guide the eye upward, bringing balance and dimension, no bronzer or shadows required.
In this piece, we’re breaking down the techniques that make blush work harder: placement that lifts, gradients that shape, and clever transitions that show it all in motion. Whether you’re going for natural glam or full-face beauty, this is your cheat sheet to strategic cheek color.
Placement That Elongates: The Art of the Upward Flick

If you have a round face, the instinct might be to smile and pop blush right on the apples of your cheeks. That’s cute, yes. But it also emphasizes width and fullness. To create the illusion of elongation and lift, you need to rethink that placement.
- Skip the apples Instead of concentrating color on the roundest part of your cheek, shift it slightly higher and outward. Think: mid-cheekbone to temple, at a diagonal angle. This draws the eye up and out, adding verticality to a face that’s naturally more horizontal.
- Use a brush with an angle Angled blush brushes naturally follow the contour of your cheekbone, making it easier to blend upward without dropping the color too low. Start at the mid-point of the cheekbone and flick up toward the hairline, not toward the nose.
- Focus on outer thirds The outer third of your face is your lift zone. Concentrating blush in this area sculpts the face by creating shadow and depth, without the heaviness of bronzer. It also keeps the center of your face bright and clean, which helps with the illusion of length.
- Tap, don’t drag The way you apply matters. Tapping in your blush helps maintain control over where it sits. Dragging or swirling can move product too low, flattening the lift effect.
This isn't just about shaping, it’s about intention. Each placement sends a message. For round faces, that message is: elevate, extend, refine.
Use of Gradients: Blush That Builds and Blends

Once you've nailed the placement, it's time to build depth. That’s where gradient techniques come in.
Gradients help your blush look more dimensional, not like a flat patch of color. For round faces, they’re essential for creating sculptural effects that mimic natural shadow and flush.
- Choose the right base Cream blushes are ideal for building gradients because they blend seamlessly and melt into the skin. Powder blush can work too, especially if you’re layering over cream for longevity.
- Start with a sheer base layer Apply a soft wash of blush across the high points where you want lift. This should be diffused, almost like a watercolor tint.
- Add intensity higher up On the top edge of the blush (closer to the temple), tap a more pigmented version of the same shade. This creates a smooth transition from soft to strong, pulling the eye upward.
- Blend edges with a clean brush Use a clean, fluffy brush or a damp beauty sponge to soften the edges of the gradient. The goal is a seamless fade and not a harsh line.
- Add a touch of highlight, not shimmer Instead of using glittery highlight, opt for a dewy cream or satin-finish highlighter above the blush to add lift. This gives a natural sheen that catches light and emphasizes cheekbones.
Gradients are visual storytelling. They show movement. They show process. And when shot on camera, they give the blush that sculptural, glowing-from-within quality that makes the whole look feel elevated.
Before/After Transitions: Showing the Impact

There’s no better way to show a product’s power than a good before-and-after. For blush, this isn’t just about color payoff. It’s about seeing the structural transformation.
- 1. Keep the face neutral pre-blush Start with base makeup, foundation, concealer, maybe brows, but no color. This sets a clean canvas that really lets the blush shine.
- 2. Shoot from the same angle Consistency is key. Same lighting, same head position, same expression. This lets viewers focus on what changed and not on distracting shifts in pose or light.
- 3. Use natural lighting when possible Sunlight or soft diffused lights show the true tone and texture of the blush. Studio lighting can sometimes flatten gradients or add artificial shine.
- 4. Side-by-side comparisons Split-screen edits are especially effective for showing lift. One side neutral, one side blushed and the contrast becomes a teaching tool.
- 5. Short-form transitions If you’re filming reels or TikToks, quick transitions like a swipe of the hand, a head turn, or even a beat-drop blush reveal make the before/after feel dynamic and fresh.
These before/afters are more than just satisfying, they’re informative. They show the precise visual impact of good blush placement, and for round faces, that impact can be game-changing.
Blush Shades That Enhance Lift

The color you choose matters. Round faces benefit from shades that have both warmth and depth not too pale, not too dark, and definitely not too flat.
- Soft corals and warm peaches These bring brightness and life without overwhelming the face. Perfect for daytime lift.
- Rosy pinks with a hint of berry These work beautifully to add structure. Berry undertones provide depth, especially on medium to deep skin tones.
- Terracotta and muted mauves Great for sculpting, especially when paired with gradient layering. They add subtle contour through tone, not shadow.
Avoid overly cool or bubblegum tones as they tend to sit on the skin without blending into the natural undertone, making them harder to use for lift-based techniques.
Tools That Make It Easier

Sometimes, the right technique is only as good as the tool you use. Here’s what makes application smoother and smarter.
- Angled blush brushes for targeted application
- Duo-fiber brushes for soft gradients
- Beauty sponges for seamless blending
- Cream blush sticks for precise upward flicks
- Mini fan brushes for applying highlight just above the blush zone
Pairing good tools with smart placement is what elevates blush from “pretty” to “pro.”
Admigos : Edits That Map and Lift
At Admigos, we animate blush placement in a way that’s educational and cinematic. Using motion graphics and real-skin overlays, we show how small changes in angle and placement can completely shift how a round face reads on screen.
Our videos highlight:
- real-time gradient transitions
- animated face-mapping with line overlays
- lift-focused before/after transformations
- multi-tone blush blending in smooth slow motion
We believe in showing technique as an art form. Not just makeup, but movement, structure, and emotion. When your product is all about the cheeks, we make every flick and fade count.
Final Thoughts: Lift Is in the Details
Blush for round faces is about strategy. It’s not about changing your face it’s about elevating it. With the right placement, the right blend, and the right shade, blush becomes a sculptor’s brush.
You don’t need heavy contour. You don’t need to fake shadows or carve out jawlines. Just a well-angled swipe of color, a soft gradient fade, and a little light, working together to lift, elongate, and empower.
Round is beautiful. And with these techniques, round gets range.
So pick up that brush, aim high, and blush smart.
Links to be checked:-
How to Visually Differentiate 4 Types of Foundations
A chic, visual guide to liquid, stick, powder, and mousse—because choosing the right base shouldn’t feel like rocket science.

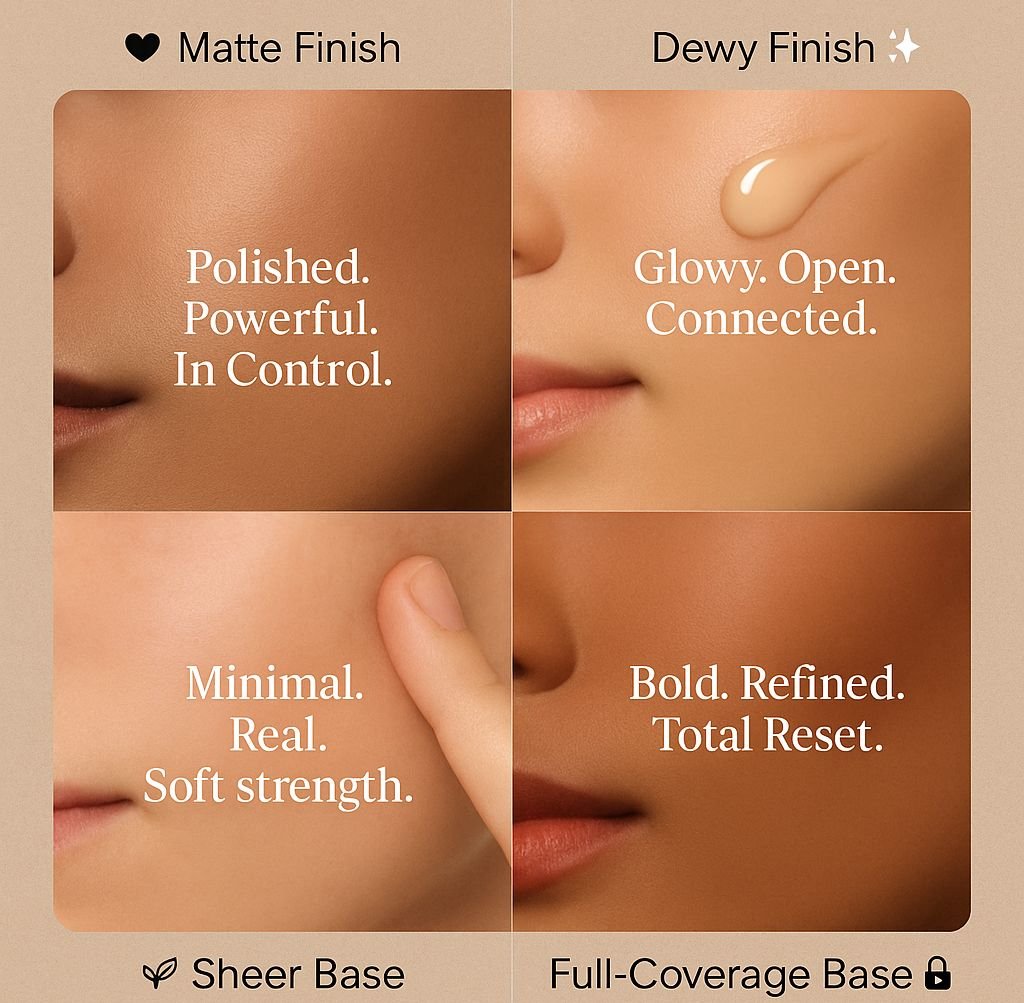
What Base Products Say About Consumer Beauty Values
A modern, visual exploration of matte, dewy, full-coverage, and minimalist base products—decode your beauty vibe and what it communicates about you.